Wednesday, December 16, 2015

How to add a new Skype for Business user using Control Panel


  • Go to "Users" tab on the left and select "Enable users".


  • Click the "Add" button


  • Type the user name or display name of the designated user, select tthe user from the list and click OK. !!!The user has to have a valid email address in order to have a Sip address(Skype account)!!!. Notice the first account will not be able to acquire a Sip address. The second one will.


  • After selecting the account, you have to assign the user to your pool from the dropdown menu, also select the policies accourding to your IT Policy and select "Enable".


Wednesday, December 9, 2015

KB3114409 causes Outlook 2010 to open on Safe Mode - How to exclude from WSUS

Outlook 2010 opens on safe mode after Windows Update KB3114409. Microsoft has accepted this issue and currently working on it. If you are having this issue as well, simply uninstall the update.

Go to Control Panel\Programs and Features, on left panel you will see " View installed updates". Click and search for KB3114409 and uninstall.

To stop spreading the defective update on Wsus, select "Updates\All updates" on the left panel. Select "Search" on the right panel and type KB3114409.

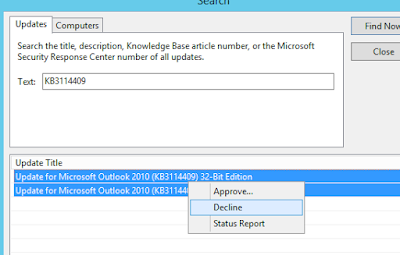
Right click both updates and select "Decline", Wsus will ask for confirmation, just accept it and you are safe.

!!!It would be wise to double click both updates and discover which computers got the update already, before declining KB3114409!!!

Friday, December 4, 2015

Automate Skype for Business Client setup using Office Customisation Tool (OCT)

  • Download Sykpe Client from Miscrosoft Volume Licensing Service Center.
  • From start menu, type "cmd" and right click "Run as Admin".
  • Mount the downloaded ISO file, type "D:\setup.exe /admin" assuming the mounted ISO image has the drive name "D".
  • Specify your company name
  • Under "Licensing and user interface" select KMS if you have it on your premises, MAK if you have ordinary key distributed over Microsoft licensing site. Be sure to select accept box to skip License Agreement.
 
         If you want the installation to be in silent mode and installation should not be cancelled, select "Suppres modal" and "No cancel".
  • Under "Remove previous installation" tab you can select if the setup removes previous versions or not.
  • Under "Modify Setup properties" tab, enter "AUTO_ACTIVATE" with the value "1" in order to trigger auto activation.
  • Save your work, extract the ISO file (you can use WinRar) and place the saved file under "updates" folder.
  • If the user has not administrative privilages on the computer, the installation will fail. So it may be wise to press shift key on your keyboard and right click the setup icon, select "Run as a different User" and enter an admin credential.


Tuesday, September 29, 2015

How To Upgrade Windows Server 2008 R2 Standard Edition to Enterprise Edition


First open up a command prompt with administrative privileges.


Then,
 
 
  • To determine the installed edition, run:
 
DISM /online /Get-CurrentEdition
 
 
  • To check the possible target editions, run:
 
DISM /online /Get-TargetEditions
 
 
  • In order to upgrade the server, run the following command:
 
DISM /online /Set-Edition: /ProductKey:XXXXX-XXXXX-XXXXX-XXXXX-XXXXX
 
 
  • Notice the "edition ID" should be one of the outputs from "DISM /online /Get-TargetEditions"
Such as  "ServerDatacenter" or "ServerEnterprise"

  • ProductKey should be a generic key assigned by Microsoft. This is a KMS key. Use the following key: 489J6-VHDMP-X63PK-3K798-CPX3Y

Example:    DISM /online /Set-Edition:ServerEnterprise /productkey:489J6-VHDMP-X63PK-3K798-CPX3Y

Here is the link for the official site that holds the keys:
https://technet.microsoft.com/en-us/library/jj612867.aspx
  • After applying the command below, reboot your server and notice that the server is upgraded and awaiting activation. You can enter your own key and activate the server.

PS: you can not do these on a DC. Demote the domain controller first, then upgrade.


Thursday, August 29, 2013

How to Export a User Mailbox on Exchange Server 2010

  • Go to Exchange Powershell and enter the following;
New-MailboxExportRequest -Mailbox USERALIAS -FilePath \\someserver\users\USERALIAS.pst

This command starts building up the PST file on the location mentioned as \\someserver\users\USERALIAS.pst.


  •  To monitor the process type;
Get-MailboxExportRequest | Get-MailboxExportRequestStatistics

This will allow you to see the ongoing process.


After the job is done, you will see the "100%", now you can delete the export request.

 
  • Delete the export request by;


How to move System Mailboxes

Getting rid of the old mailbox database? Before you delete the old one, you have to move the system related mailboxes to the new one. This is how you do it on Exchange Server 2010;

Go to Powershell on your Exchange Server and enter:

  • Get-Mailbox -database YOUROLDDBNAME -Arbitration


You can see the entry in the red box.
 
  • Simply enter the following command which will start the move process
          Get-Mailbox -database YOUROLDDBNAME -Arbitration | New-MoveRequest -TargetDatabase YOURNEWDBNAME
 
 
  • You can monitor the process on EMC Move Request page
  • Since the mailbox is a small one, it would take less then a minute to be completed. Afterwards right click the request and select "Clear Move Request" to finish the job.
 

Wednesday, August 28, 2013

How to get WWN info on Hyper-V and Powershell

So you need to get the WWN numbers on your server (Windows Server 2012).


  • Open up a powershell with administrator privileges( Right click on powershell icon and choose "Run As administrator".

  • Run this command which will give you the WWN numbers :
                    Get-InitiatorPort


PS C:\Windows\system32> Get-InitiatorPort

InstanceName                  NodeAddress                   PortAddress                   ConnectionType
------------                  -----------                   -----------                   --------------
PCI\VEN_1657&DEV_0022&SUBS... 20008c7cff0d7d00              10008c7cff0d7d00              Fibre Channel
PCI\VEN_1657&DEV_0022&SUBS... 20008c7cff0d7d01              10008c7cff0d7d01              Fibre Channel


There you go.