Thursday, October 8, 2009

How to Change IP Settings Remotely

In order to edit or change the IP settings of a remote client in your enterprise, you would need some tools and a set of command line knowledge. To get there in no time, simply follow these steps:


* Download the PsExec tool. This tool helps you run software on remote machines over command line.


*Unpack the zip file under your c:\ . Open up a command line, navigate thru the pstools to find PsExec.exe .


* The command goes like this;


c:\psexec \\remotemachineip -u username -p password cmd.exe


\\remotemachineip : Here you can enter the IP of the remote client OR the computer name of the client. i recommend going for the IP to avoid DNS problems.

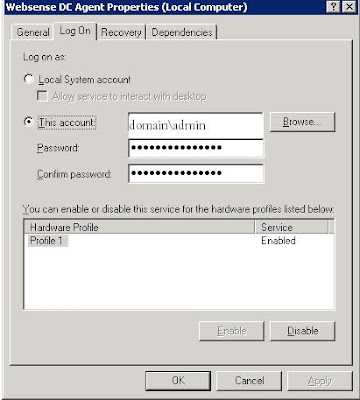
-u : user name that has administrative rights on the remote client. In an enterprise, please DO include the domain and the user name as domain\username.

Example : contoso\administrator01 .

-p : password of the user name that has administrative rights on the client machine.

cmd.exe : this is the tool we will need to edit ip settings.

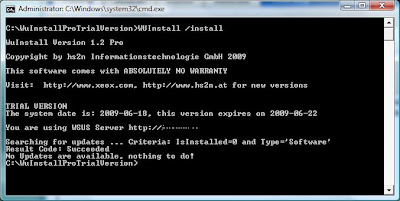
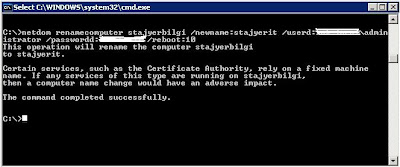
* After entering the command , you will see some lines passing through and finally you will get c:\windows \system32 . This means that you have successfully logged in the client machine and its cmd.

* type netsh and press enter. Netsh is a tool that allows you to mess with your network settings.

*type int and press enter. int stands for Interface.

* Under netsh interface , enter this command that will change the IP settings.


ip set address local static theipnumber thesubnetmask thegateway metric


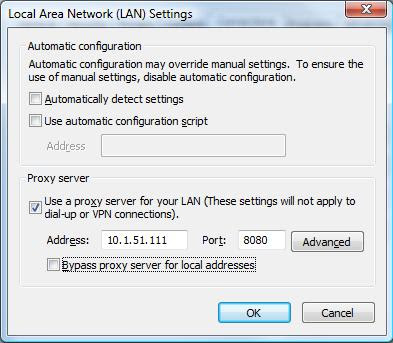
theipnumber : this is the desired ip address.

thesubnetmask : this is the subnet mask suitable for the desired IP

thegateway : gateway IP that will let the client machine to Internet

metric : the metric of the gateway that will prioritise the entries of different gateways respectfully.

Friday, July 17, 2009

How to Assign Computers to Groups on WSUS Server

Wsus server comes with an option that is used to manage designated updates for user created groups, so that an update needed on a computer can be installed without interfering other computers with different policy sets. To do that,

Open up the WSUS console from Administrative Tools menu. On the console open up "All Computers", right click and select "Add Computer Group..".


Input a desired name for the new group of yours.


Go to the "Options" screen and select "Computers".


I would recommend using the "Use the Update Services console" option. This way you are able to assign the computers directly from the WSUS console.


Now that you are ready to assign a computer to a group on WSUS Server, go to "Computers\All Computers\Unassigned Computers". Right click the computer name you want to process, click "Change Membership..",


and select the appropriate group.


Now go to "Updates\All Updates". If you don't see any updates, you may need to change the settings up in the "Approval" and "Status" combo boxes. Right click an update and select "Approve..".


Here you can see all the groups you create and assign an approved update to them.


After selecting multiple updates and approving those for installation or removal, the folloving screen appears and lets you know how the process is going.


WSUS Server is essential for mid size and large companies in order to keep up with the updates and not draining your internet speed.

Monday, June 22, 2009

Feed The Frog Please


A fully customisable frog gadget for your site. Available here along with other nice stuff.

Increase Exchange 2003 Standard Database Size

With Sp2, Microsoft Exchange 2003 Server database size had been increased to 18GB. Well nowadays a Bluray disc has 40GB of storage, even 18GB is not a big number anymore. However you may need a bigger space, as the Exchange server 2003 standard edition supports up to 75GB of data.

To increase the size of the database;

First enter "regedit" on the run box on the start menu.

Then find these subkey

  • HKEY_LOCAL_MACHINE\SYSTEM\CurrentControlSet\Services\MSExchangeIS\\Private-GUID
  • HKEY_LOCAL_MACHINE\SYSTEM\CurrentControlSet\Services\MSExchangeIS\\Public-GUID
The GUID at the end of the subkey is a long folder packed with numbers and letters.

Enter a new DWORD Value for both of the subkeys. In the "New Value #1" box, type "Database Size Limit in GB", click OK. Right click the DWORD , click modify and enter the amount you wish to be your max database size. Don't forget to enter an integer from 1 to 75. 75GB sounds just good.

Close the regedit screen. Open up the Run box, enter "cmd". At the command prompt type;
  • net stop msexchangeis

After the service stops successfuly, type;
  • net start msexchangeis

All done! You can verify your success by taking a look at the event viewer console. Under "Application" tab, look for the event with the ID 1216.

How to Clean Your Exchange Log Files

Exchange log files usually take a lot of space if you don't automate a backup to run from some time to time. If you find yourself out of space on your drive, here is the thing to do.

From Start menu, type "ntbackup" on the run box.


Backup Utility screen appears. Select the "Backup" tab and go to the "Microsoft Exchange Server" box, expand and click "Microsoft Information Store".


The following screen gives you some info and schedule options.


And here is the screen that you can watch the statistics till the end.


After a nice backup of Exchange Information Store, ntbackup simply deletes the log files, freeing the space you need.

Thursday, June 18, 2009

Enabling Websense to Find Domain Objects

After setting up Websense Enterprise Server to be your faithful proxy server, you would probably want to add some domain groups and manage them.

To do that you right click on the Websense console, select "Add Directory Objects..."


"Select Objects to Add" box opens up. And you double click the "Directory" folder.

But instead of showing up the domain objects, you get an error telling you to check the "Directory Service"configuration under the "Settings" menu. If you read the help files, then you SHOULD know that you won't need to mess with the Directory Settings, as the "Windows NT Directory/Active Directory (Mixed Mode) option should be selected.


What you NEED to do is to simply give permissions to a service.


"Websense User Service" and "Websense DC Agent" needs to access the domain controllers. Therefore, right click on one of the services, select "Properties". On the "Log On" tab, select "This Account" and enter your domain admin credentials. Do this for the services mentioned above. Restart the services. All done!

How to Exclude an Address Being Filtered by Proxy Server on Internet Explorer

So you need to set up a connection to a designated address but the connection is filtered by the proxy server even tough you excluded the address or configured the server not to(In my case it was the frikkin Websense and ISA server combo). Thank Bill for adding a small box into the Internet Explorer that helps us to bypass the proxy check and go directly to the site.
3 single steps to fool your proxy server.

First open the "Internet Options" from control panel.


Then go to "connections", "LAN settings". Click "Advanced" on the following menu.


The "Exceptions" box, is the solution. What ever you enter in this box, Internet Explorer will skip redirecting requests to the proxy server.


By the way, if you want this to work properly, your gateway should be able to access the Internet on its own, eliminating the need for a proxy server distributing Internet. Or you can always enter custom route of course.

Wednesday, June 17, 2009

Force Wsus Server to Update Computers

Tired of waiting for the Wsus server to update the client computers? There is a simple solution for that. Comes with a trial version, WuInstall is a software that triggers available windows updates. You can search and install the new updates on demand.


Easy to use, just got to the directory where the exe resides. Add the switch "/install" to search and install the available updates.

Tuesday, June 16, 2009

Setting/Resetting a Password Of Your Windows User

Pretty simple. Locate "My computer" icon. Right click the icon and find "Manage".


On the "Manage" screen select "Local Users and Groups"\"Users" and find the user name that is to be configured. Right click on the user name and select "Set Password...". I always wondered what those ... symbols represent at the end of Set Password option.


The following screen indicates some important stuff which we will never read. Take a look if you want. It's a warning about how you can ruin your computer just by resetting your password. Pure crap with steam on it. Just select "Proceed" button.


Enter the new password twice and you are good to go.


Yes, that's it . What did you expected anyway? And by the way, from now on users without passwords will have to enter their password at start up screen and on the lock screen.

How to See Windows Shares on a Mac

Thanks to Mr. Appleseed, it is pretty easy. Press the command(apple)+K on Mac's keyboard. A screen will appear like this.

The Server Address box comes empty. You should enter the ip address of the designated computer which you want access to. However since you are trying to connect to a Windows machine from a Mac, you put "smb://" in front of the ip. I strongly recommend using ip numbers instead of computer names. No need to add extra the DNS troubles, right?
Click "Connect" and a log on screen appears.

By default you will see your name on the log on name box. You have to supply a user name that has access rights on the shared folder. Then click connect again and after a successful log on, you will see a screen similar to this with your beloved folder in it.
If you are not on a Windows domain but on a Workgroup(like most home users) you have to have a user that has access to the Windows computer with password enabled. If you log on to your Windows computer just by pressing the power button and waiting to see the desktop, you need to set a password to your account.

How to Rename a Computer Remotely

You don't have to visit each client computer of yours if you want to rename the computer names. There is a less painful way which takes a lot less time. Introducing "netdom.exe" tool. Comes with the support tools pack within WinXP or 2003 Server. Works only on Windows XP and above. The command is simple but a bit long. It goes like this:

c:\netdom renamecomputer currentcompname /newname:thenewone /userd:domainname\administrator /passwordd: *yourdomainpassword* /reboot:secondsbeforereboot

NOTE: The underlined "passwordd" syntax is perfectly correct. Yes there is a "double d".

After you press enter, a pop up appears that if you wish to continue. Simply press yes ,then viola!
Here is a screen shot. The computer's name is changed without a single step.

For more help, take a look at this site.

Monday, June 15, 2009

Gather IP Info of Your Clients

In some cases you would like to gather the ip informaton of a remote computer without logging on to the machine or even not going near the computer. For obvious reasons (stealth) IT crowds can use a free tool that is really easy to use. The little tool is called Remote IP Configuration Tool "RmtIpCfg.exe". Just place the tool under c:\ for easy access.

Usage is plain,on the command screen, go to the place that the tool is, then type the ip address after the rmtipcfg.exe. Like this:

c:\rmtipcfg 192.168.1.10
Only 3kb big and real fast tool it is. Thank you Skrubbeltrang.com.

Nod32 v.4 Enabling Mirror Menu

You are setting up a new Nod32 Enterprise server. First thing to do is to run the setup that will install server side of the application. Then comes the Remote console setup. At last you install nod32 antivirus software on the server. If you have many locations, many branches that reside out of your LAN, and you don't want the other servers download the virus definitions again and again, you need to set up a mirror on your core server. That way the lower ranking servers would download the necessary updates via the reliable connection from your core server.
To show the mirror tab on your core server's configuration menu, first

-open up the config menu by pressing F5.


-scroll down to Licenses and add your unique license given by ESET.


-now go to update tab on the config , Advance Update Setup. And there is the Mirror option.